Friday, October 31, 2008

When a Black Cat Talks...

...you really should listen, especially if it's on Halloween.


Select party-themed stamp sets are available at 20% Off their regular prices, with the purchase of $20 in any other catalog merchandise, THROUGH TONIGHT ONLY! These sets lend themselves wonderfully to year-round use, for anyone's birthday. I have tons of ideas and samples I will freely share with you, to give you inspiration and direction in creating your own cards, no matter which set(s) you choose.

Check out THIS flyer for all the details of this SALE, then go to my Stampin' Up! Web Site and click on the SHOP NOW rectangle near the top right of the screen, under my name and contact information. You will be able to place your order online, with a debit or credit card, for immediate delivery, directly to your door! Online ordering is the only guaranteed method for you to take advantage of this sale on its last day, today.

LAST MINUTE ONLINE ORDERING BONUS: Anyone who places an online order of $50 or more BEFORE MIDNIGHT ON HALLOWEEN NIGHT will get their choice of a FREE set of 10 hand-stamped custom-designed Christmas/Holiday cards, or a FREE set of 10 handmade custom-designed Thanksgiving placecards, or a FREE festive/seasonal customized Pennant Banner!!! If you choose to order $100 or more, you may pick TWO Bonus Gifts. For an order of $150 or more, you may choose THREE Bonus Gifts (in any combination), and you will also qualify for the online version of Hostess Benefits, which are called Stampin' Rewards--for a total bonus value of at least $75.00!!! If you've been thinking of ordering the Big Shot die-cutting machine, this would be a sweet time to make that purchase.

HAPPY FRIGHT NIGHT :-)

Thursday, October 30, 2008

Of Candy Boxes & Bars


So, I've been a bit MIA lately...I really like Halloween and I've been trying to get everything in line before the big event, which doesn't happen very easily with 4 kids who go to 3 different schools, living in the house! It's not just school, it's the volunteering at their schools, getting them to and from activities, making "treats" and birthday cakes and all that stuff. Do I have to do all that? No, you're right, it's my choice. Although, kids do tend to be less whiny and sullen when you actually pay attention to them on a regular basis. Even the teenagers, as much as they try to disassociate themselves from Mom, seem to benefit from it in at least small amounts!

And of course, there's the freakin' laundry. I hate laundry, but even more than hating doing laundry, I hate someone else doing the laundry. Yes, I'm a bit of a control freak about that--mainly because MY clothes are inevitably the ones that get ruined if someone else gets their paws on the machine. And more than hating to do laundry, I hate going clothes shopping. My dream is to be able to hire someone to do the laundry and regular cleaning, so I don't have to vacillate between feeling like a rotten housekeeper or a rotten stamper!!!

Anyway, one of my little projects for Halloween is hand-stamped treats. It's not as hard as it sounds, and I found some packages with boxes of candies in them that work like a charm! As you can see from the picture at the top of this post, I am filling up a big bowl with them quite rapidly. All I did was measure around the box, then cut out a piece of Ghostly Greetings Designer Series Paper to wrap around in a sleeve. Then I added a little strip of coordinating card stock to the front, and stamped images in coordinating ink colors from the Eat, Drink & Be Scary stamp set--which fit into the Curly Label Punch, and the Small Tag Punch! Super easy...now, if I can just stop snacking on the treats as I make them up, it would be awesome. (there's a little hint there at why I hate clothes shopping, by the way) Here's a closeup of some of the designs for you:


Speaking of snacking on candy, I found the NestlĂ©® 100 Grand® Fun Size bars on sale at the store and had to grab some. These were my favorite candy bar when I was a kid, and I apparently still love them because I keep eating them. I have yet to have decorated ANY, but I've eaten like 10 of them. Eeeks, talk about horrifying! But I cannot call them "100 Grand" bars, because they were "$100,000 Bars" when I was a kid. It's like the whole "KFC" thing...I absolutely cannot call it that, it's "Kentucky Fried Chicken", thank you very much. My teenage daughter is disgusted that I won't call these things by their current names. She says, "that's what they're CALLED, Mom!". Hey, not when I was her age. I must be turning into an old dog, because I just refuse to learn that new trick.


And, just in case I don't have a chance to post tomorrow:

HAVE A GHOULISHLY GREAT HALLOWEEN!

Friday, October 24, 2008

October Newsletter & Fall Festival Class

Just a note to let you know that my October 2008 Customer Newsletter has been posted on my blog. You can check it out HERE. To receive future editions of my newsletter via email, please use the signup box in the right sidebar of my blog. Archived versions of my three most recent newsletters can be found in the right sidebar of my blog. (NOTE: This is a Customer Newsletter, so if you are a SU! Demonstrator, please do not sign up for an email subscription--view the archived versions instead.)


As a reminder, I'm taking reservations for my Fall Festival Class, which will be held on November 6th, from 6-9pm in my home. The cost is $25, and we will be making Fall and Thanksgiving themed cards, placecards, treat holders, and other projects. The last day to RSVP and send payment is October 25th. Call me at 719-205-5957 or email me with your reservation, and to make payment arrangements.

For a special treat, check out this Studio 5 Video Segment with the Co-Founder of Stampin' Up!®, Shelli Gardner, showing a single place setting idea to take your table from Thanksgiving, to Christmas, and through the New Year!

Monday, October 20, 2008

Reindeer & Snowman Holiday Toppers

I know, I know...Halloween's still not over yet, so please don't shoot me for posting this! I was sitting here and got a couple of ideas and had to try them out. And of course, once I was done, I just had to share them! Don't get disgusted and stop coming to my blog, I promise I'll post more Halloween, Thanksgiving, and fall stuff again soon :-)


These would make adorable stocking stuffers, as well as party favors, so I wanted to get them posted to allow you to plan ahead. If you have a child who's having a holiday party at school, or you or your spouse is having a holiday party for work, or you want some little goodies you can set aside to give your postal worker, package delivery person, or other people you'll see during the holidays, these are just ideal to make ahead and keep on hand.

Of course, some people might be offended by the "poop" sayings and being called naughty, so I made sure to create alternative tags for each topper.
  • Click HERE to download Reindeer Poop tag
  • Click HERE to download Snowman Poop tag
  • Click HERE to download Reindeer Food tag
  • Click HERE to download Snowman Soup tag
  • Click HERE to download Reindeer Kisses* tag
    * (NEW! - Thanks to demonstrator Sami Flanagan for the idea and verse)
Both toppers were made using the Bigz™ Top Note Sizzix die, available exclusively from Stampin' Up!®. The snowman topper is Whisper White, and the reindeer topper is Creamy Caramel. The reindeer topper also uses the Tulipe Bigz™ die, for the antlers and eyes. To get all your reindeer parts from your Tulipe die in one cut, place a strip of Chocolate Chip card stock over the flourish parts which will make the antlers, then place two small pieces of Basic Black over the little oval in the center of the Tulipe design, for the eyes. You can run all 3 of these card stock pieces through the Big Shot die-cutting machine at the same time. The tags were printed on card stock and trimmed out, then adhered to the front of the bags with Mini Glue Dots®.


Reindeer Design Notes: Cut apart the flourish of the Tulipe to get 2 antlers. Because they are so delicate, you'll want to use the Two-Way Glue pen to adhere the antlers to the topper, placing adhesive only on the area that will be glued down. You can mark this by holding the antler in place while turning your topper over, then using a pencil to trace around the Top Note edges where the antler extends past it. Then, simply keep your adhesive within those lines on the back of the antler, and you should be fine. A 3/4" Circle Punch was used on Real Red card stock for the nose. The eyes and nose were adhered with Mini Glue Dots®.


Snowman Design Notes: Cut a piece of Basic Black card stock to 3/4" by 4" for the hat brim, and 2" by 3" for the hat top. Use the Corner Rounder Punch to round all 4 corners of brim, and top 2 corners of hat top. Adhere Baja Breeze 1" Double Stitched Grosgrain across hat top piece, approximately 3/4" from the top (you'll need about 6-1/2" of length to wrap around hat top). Then, line up bottom of hat brim with bottom of hat top, center with hat top (leaving about 1/2" on each side), and adhere. You may use Sticky Strip, but a few Mini Glue Dots® will work just as well. Adhere hat to front of folded Top Note (again, Sticky Strip works wonderfully, but Mini Glue Dots® are much more convenient and do the trick). The eyes are made using the 1/2" Circle Punch on Basic Black card stock, and the nose (carrot) was made using the Word Window Punch on Pumpkin Pie card stock, then trimming one end with Paper Snips. The eyes and nose were adhered with Mini Glue Dots®.

Cello Bag Contents: For Reindeer Poop, you can use malted milk balls, chocolate covered raisins or peanuts, or any other roundish, brown treat! For Snowman Poop, the most commonly used treat is marshmallows, but you could also use yogurt covered raisins, white mints, or any other white, roundish candy. For Reindeer Food, mix 1/4 cup rolled oats with either red or green sugar crystals, like those used to decorate cookies. This keeps the "sparkle" edible and biodegradable! And for the Snowman Soup, place 1/4 to 1/3 cup cocoa mix, one or two Hershey Kisses, a few mini marshmallows, and a miniature candy cane in your cello bag. (UPDATED to ADD: for Reindeer Kisses, use any kind of chocolate kisses.)

If you slide your cello bag all the way up to the fold of the topper, and then adhere the topper to the bag, you probably don't need to seal your cello bags when you enclose candy, but if you have oats or cocoa mix in the bag, it will surely leak out if the bag is overturned. You can fold over the top of your cello bag in one or two small folds,and staple it shut to help seal it, or use a commercial sealer that actually melts the cello together.

DISCLAIMER: If you decide to make and sell these toppers, please note that the die designs are exclusive to Stampin' Up!®, and the tags were created using Stampin' Up!®'s Write Me a Memory Font CD (Vol. II - Jodyola font), so all of your creations using these pieces MUST include a copyright notice in accordance with the Angel Policy.

Sunday, October 5, 2008

Back to the Future Halloween

I thought I'd share a couple of projects I made tutorials for in October of last year. Both of them use the Batty For You stamp set, which is still available this year. However, the basket is decorated in Designer Series Paper (DSP) which is no longer available, and the box is decorated with a wheel that is no longer available.

To bring you Back to the Future to reproduce these goodies, I recommend using Ghostly Greetings Designer Series Paper for the basket, and the Scary Skulls wheel for the box (the wheel is not actually scary, and it features a solid image very similar in size to the jack-o-lanterns on the wheel I used in the box tutorial). In addition, you now have the opportunity to purchase the Scallop Edge Punch to finish the flap on your box, instead of using the Corner Rounder Punch in a modified manner.


Click HERE to view the Creepy Little Basket Tutorial.


Click HERE to view the Spooky Little Box Tutorial.

When you're ready to purchase your supplies, hop on over to my SU! web site and click on the SHOP NOW button near the top right of the screen to place your Online Order! If Halloween is not your thing, and you don't care for orange and/or purple, and you'd like to make these projects with other images and/or in other colors, just email me and I'll gladly help you with your custom design needs :-)

Friday, October 3, 2008

More Halloween Ghirardelli Treat Holders

Remember yesterday when I said these would be cute made in Ghostly Greetings Designer Series Paper, with the Chills & Thrills Rub-ons? Well, I don't think I was wrong...these may be the cutest Halloween treats I've ever made! [Remember, click on any image to see it larger.]


You can find the TUTORIAL for these gems right HERE. The hardest part of making these was restraining myself from eating all the chocolate squares before I could put them in the holders. This is definitely a project I need to do with my jaw wired shut! Actually, I did make these a lot more complicated than necessary, but I was having a lot of fun and I just couldn't stop myself. They look totally adorable with just the Ghostly Greetings Designer Series Papers layered on them with a contrasting color of card stock.

I'm not going to go into detail on how these were put together, but I do want to make a few notes. First, for the Basic Black and Basic Gray holders, I did not use Textured card stock. I think they look a little flat, so I highly recommend buying a package of the Neturals 12"x12" Textured Card Stock Assortment for these. I also varied from my first measurements and made my DSP layers 2-3/4" x 1-3/4" on these treat holders, and made the card stock layer below them just about 1/16" longer on each side.

I used Kiwi Kiss and Pumpkin Pie Textured card stock for the green and orange treat holders. You might find it more convenient and cost efficient to purchase an In Color 12"x12" Textured Card Stock Assortment and then use the Kiwi Kiss and Tangerine Tango colors. However, Pumpkin Pie is the color which directly coordinates with the Ghostly Greetings Designer Series Paper. If you choose to go ahead and purchase an individual package of Pumpkin Pie 12"x12" Textured Card Stock, you can use that again to make placecard treat holders for Thanksgiving.

To tie the treat holders closed, I used four different products: Kiwi Kiss Striped Grosgrain, Tangerine Tango Striped Grosgrain (you could always substitute Pumpkin Pie Striped Grosgrain for this), Black Hemp Twine, and Rope Twine (New! Find it in the Holiday Mini Catalog) which I unraveled after I knotted it. Also, the Earth Elements Colored Buttons coordinate well with Kiwi Kiss and Pumpkin Pie. And I couldn't pass up using the Curly Label punch from the Curly Label Punch Bundle. The Curly Label punch also works with one of the images in the new Eat, Drink & Be Scary stamp set in the Holiday Mini Catalog, so it can do double duty on your spooky stamping projects!

You might also notice that I used the Large Oval Punch, and the Wide Oval Punch. And, I did a little distressing with the tool in the Cutter Kit on some of the punched pieces. I also trimmed out some of the pieces in the Chills & Thrills Rub-ons, to omit parts or use parts separately in different orientations. Finally, on the black pumpkin rub-on I put on the Kiwi Kiss "boo" tag, I actually used my 1/8" punch to punch out his eyes, and used my Hobby Blade to carve out his mouth, then layered that tag onto Pumpkin Pie card stock.

Even if you don't want to make these treat holders for Halloween, you still have my permission to buy some Ghirardelli Chocolate Squares™ to keep by your stamping desk for times of creative crisis ;-) Of course, if your kids see them, you can always explain they are for a "project", and you can show them my tutorial if they call your bluff!!!

Thursday, October 2, 2008

Ghirardelli® Chocolate Square Holder Tutorial

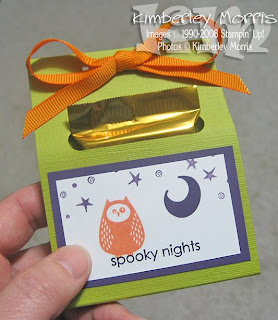
As promised, here are the instructions for making the Halloween Ghirardelli Treat Holder pictured below. If you don't see them in your local store, you can find Ghirardelli® Chocolates online HERE.


Cut a sheet of card stock to 3"x8" for the base. Because of the round numbers, Textured 12"x12" card stock is ideal to use for this project. You can get four 3"x8" treat holder bases from each 12"x12" sheet. If you order an assortment of In Color 12"x12" Textured card stock, you can use the Kiwi Kiss and Tangerine Tango sheets together. Simply cut the 3"x8" bases from each sheet, then use the leftover scraps of each sheet to layer onto the front of the opposite color base!

Okay, back to where I started--cut a sheet of card stock to 3"x8". Then score the card stock at 3-7/8" and at 4-1/8". [Remember, you can click on any picture to view it at full size.]


Optional: If you want to use a Stampin' Around wheel to decorate the base, you should do that now. Just be mindful of your placement with any words or images on your wheel which have a definite "right side up" pattern, as shown in the picture below. Use plain paper to cover and mask off areas on which you don't want the wheeled pattern. Be aware that about 2-1/8" of the top front of your holder will be taken up with the slot for the chocolate, and with a ribbon closure.


From one end of the card stock (choose either, it doesn't matter), slide your Word Window Punch as far into the card stock as it will go, and punch. You will be punching over it on each edge, so just do it somewhere in the middle for placement, as shown below.


Then slide your Word Window Punch over until the side of the punch casing is even with one edge of the card stock. Punch, then repeat this process on the opposite edge of the card stock. See the pictures below for more notes.


You will end up with an extended Word Window Punch shape across one end of your holder, as pictured below. This will be the front of your holder.


Decorate the front of your holder as desired. The area you'll have to work with runs from just below your Word Window punched hole, to the score line, and is approximately 2-1/4". The bottom decorative card stock layer on my treat holder is 2-3/4" x 1-3/4", and the top white layer is 2-1/2" x 1-1/2".


I used Kiwi Kiss, Tangerine Tango, and Eggplant Envy for this project, as I really like that combination for Halloween. The Eggplant Envy card stock I used is not Textured, because I'm layering over it, and it seems a waste to me to have most of the Textured card stock covered up! I also used the Halloween Frights stamp set, and the Frightful Fence wheel (shown on the Optional sample), both available for you to order now from the Holiday Mini Catalog.

After you have decorated your holder, punch two holes in the top front above the Word Window punched hole, with the Rectangle Punch, for a ribbon bow. Fold the holder closed with the edges flush at the top and hold firmly in place, then punch through your rectangle holes on the front, to create holes in the back of the holder at the same place. See pictures of theses steps below:


HORIZONTAL SLOT PUNCH METHOD: This is a great alternative to the Rectangle Punch shown above. Simply slide your card stock into the Horizontal Slot Punch as far as it will go, then line up the corner of your card stock with the bottom piece of metal on the punch, and squeeze. No measuring, no worrying if it's straight or not. I recommend punching each of the 4 corners separately, because it's not good for your punch to punch through more than one layer at a time. (See pictures below for visual--click images to see them larger.)


Thread ribbon through rectangle holes and tie in a bow or knot at the front of your holder. Slide your Ghirardelli Chocolate Square into the Word Window punched slot, and you're ready to share a treat with your favorite ghouls and gargoyles!


On the Frightful Fence sample below, I used brads to close the treat holder, then cut out some shapes from the Halloween Frights stamp set and adhered them over the brads, and in other decorative positions. I also used a Blender Pen in Close to Cocoa ink to go back over the fence and fill in some of the spots which were omitted due to the texture of the card stock. And as a final highlight, I went over the cobwebs in the fence with a Basic Black Stampin' Write® marker.


These Ghirardelli Chocolate Square treat holders can be made even more quickly and easily by using the Ghostly Greetings Designer Series Paper, and you can even include greetings without doing any stamping, if you use the Chills & Thrills Rub-Ons! These treat holders are also versatile throughout the year when decorated seasonally appropriate--consider making them as placecard favors on your Thanksgiving table, as stocking stuffers or treats for co-workers for Christmas, or for Valentine's Day treats. With chocolate, and sharing your creativity, at the heart of this project, you can't go wrong!